
Intro
Last semester, I studied System Administration subject and worked on a project about Ethereum applications. Specifically, my topic involved using Ethereum Private Blockchain as a distributed storage system. I found this quite challenging initially because I knew nothing about distributed storage or how to build DApps on Ethereum. I asked my teacher for help, and he suggested some keywords like Geth and IPFS. I then researched these topics extensively, experimented, and ultimately earned an A+ score for my project. I believe it’s worth sharing my experience with everyone who is interested. So, let’s dive into it!
This post does not explain in detail what Geth and IPFS are. Instead, I will outline the structure of my project and the way I implemented it.
My repository is here. It includes the set up tutorial, so I will not mention it in this post. I suggest reading the tutorial simultaneously with reviewing the code.
Geth and Ethereum Private Blockchain
Geth is an Ethereum client written in Go. Running Geth transforms a computer into an Ethereum node. Since I only have one computer, I decided to create multiple nodes using Docker, as I wanted to learn it. I set up three Ethereum nodes using Geth. In order to make my network private, I created a bootstrap node. The bootstrap node is a normal node that is designated to be the entry point that other nodes use to join the network.
So, I have 4 nodes in my private network. To start my private blockchain with these nodes, I needed to configure my chain a little bit. First, I created a local chain with a unique chainId, which Ethereum supports. I also configured some features for my private chain such as the gas limit and consensus protocol,…. Finally, I used Docker to run all the nodes with the set up above to create my private blockchain ^^. You can read my setup in Dockerfile and docker-compose.yml.
Actually, I primarily followed this tutorial from Geth , but I ran all the nodes in Docker.
To test my private blockchain, I created accounts for each node and made some transactions:
eth.sendTransaction({to: "0xb166b7aaed24a12b3dd5dfa668ba3b9d10b1950d", from: eth.accounts[0], value: 25000})
Here is the demo:
IPFS
IPFS is a distributed file system in a peer-to-peer (P2P) network architecture. The machines participating in the system can store and upload data without going through a server. When a file is added to IPFS, it is split into smaller blocks. Each block is hashed using a cryptographic hash function, producing a unique identifier (hash) for each block. This hash is returned to the user, who can then retrieve their file using this hash.
I created two nodes, each running IPFS via Docker to participate in my distributed system. They share the same SWARM key to join the same network and communicate with each other.
To run IPFS on the two Docker nodes, I added this image to them and copied the SWARM key:
FROM ipfs/go-ipfs:latest


COPY swarm.key /swarm.key
Here is how I set up and use my private IPFS:
Combine
Now it’s time to combine my private blockchain and IPFS. Users can use my project to upload pictures into distributed storage.
Here is the structure for my project:
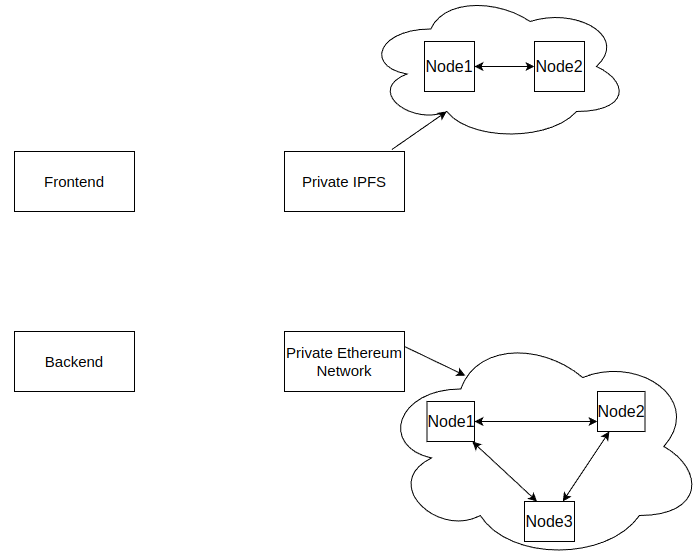
There are 4 components:
- Frontend: Where users interact with my system.
- Backend: Handle request from user via the frontend.
- IPFS: My distributed storage, consisting of 2 nodes
- Private Ethereum Network: My private network, consisting of 3 nodes.
How it works
First, let’s look at the uploading process:
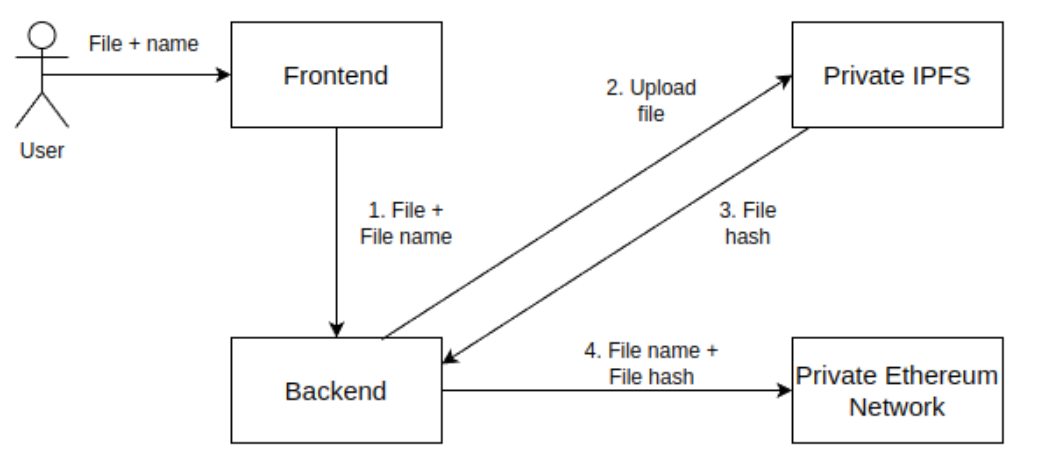
The user uploads a file with the corresponding name to our system via the frontend. The file and name are then sent to the backend. The backend uploads the file to the private IPFS and receives a hash. Next, this hash is stored in the private Ethereum network by invoking smartcontract via a transaction, which also indicates whether the file was stored successfully.
Now, let’s dive into the downloading process:
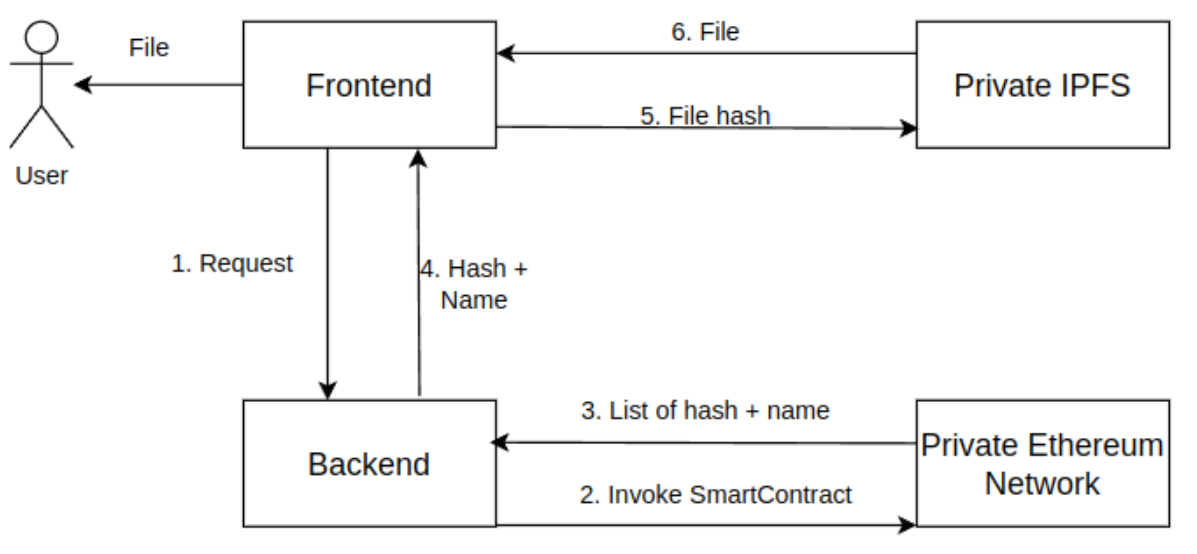
When a user requests his files via the frontend, the request is sent to the backend. The backend retrieves the hash file from the private Ethereum network by invoking the smart contract. Then, the frontend receives the hash and uses it to get the file from the private IPFS. Finally, the file is sent back to the user.
SmartContract
Above is the basic workflow of my project. To store and retrieve the file hash from the network, I wrote a smart contract
with two functions: one for storing the hash and one for retrieving it. I used Hardhat to deploy the contract on Ethereum.
Here is the contract and the setup of my project:
// SPDX-License-Identifier: MIT

pragma solidity ^0.8.0;


contract Store {

    struct File {

        string filename;

        string cid;

    }


    mapping(address => File[]) public userFiles;


    function storeFile(string memory _filename, string memory _cid) public {

        File[] storage files = userFiles[msg.sender];

        files.push(File(_filename, _cid));

    }


    function getUserFiles() public view returns (File[] memory) {

        return userFiles[msg.sender];

    }

}
# init hardhat

npx hardhat init

# select: Create an empty hardhat.config.js


# compile smart contract

npx hardhat compile


# deploy smart contract

npx hardhat ignition deploy ./ignition/modules/Store.js --network localhost
I recommend following the tutorial of HardHat here. I found HardHat quite user-friendly for beginners like me, and it took only two days to deploy everything. Since I coded the backend in Javascript, I needed to import ethers library to interact with the Ethereum blockchain.
Finally, let’s see how my project performs:
End
After this post, I hope you understand the architecture of my project, and this post will help you in some ways. You can find the full demo video and slide in Vietnamese here:
If you have any questions or need clarification, feel free to comment on this post. Additionally, I encourage you to contribute to the project by creating issues or making pull requests on the repository.